Which Character Should You Pick First?
The current roster in Slay the Spire 2 features five distinct heroes, including three returning favorites and two brand-new additions. You will not have access to the full lineup immediately, as the game utilizes the Epoch progression system to unlock new characters as you successfully clear acts and defeat major bosses. For those just starting their journey, the Ironclad is the most reliable choice for a first run.
The Ironclad begins with a substantial 80 HP pool and carries the Burning Blood relic, which restores 6 HP at the conclusion of every battle. This built-in sustain is incredibly forgiving, allowing beginners to survive tactical errors that would normally end a run for more fragile characters. In contrast, the Silent requires players to commit to specific mechanical archetypes early on to be effective, while the Defect features a slower ramp-up that demands very careful card selection over several acts. By starting with the Ironclad, you can focus on learning the fundamental flow of the game before moving on to the more complex strategies required by the rest of the cast.
How Should You Build Your Deck?
A frequent pitfall for new players is entering a run with a rigid strategy and trying to force specific card combinations to appear. Because the game’s rewards are randomized, chasing a predetermined "build" often leaves you with a deck full of synergistic pieces that never actually activate. Instead, you should stay flexible and respond to the cards the game actually offers you.
Aim to maintain a lean deck of approximately 20 to 25 cards by the time you face the Act 1 boss. Every unnecessary card you add dilutes your deck, making it less likely that you will draw your most powerful tools when you need them most. If a card reward doesn't explicitly solve a current problem or bolster your existing strengths, skipping it is usually the most tactical decision. Before worrying about complex combos, ensure your deck has a functional foundation: consistent damage output, reliable block generation, and a specific answer for enemies with high attack values.
Specialized decks only become viable once this baseline is established. Certain encounters, such as the Waterfall Giant, are designed to punish one-dimensional strategies, while specific elites in the Underdocks can limit the amount of damage they take per turn, stalling out decks that rely purely on burst damage. Always prioritize drafting cards that provide value on turn one without requiring setup, then layer in more complex synergies as your run progresses.
Remove Basic Cards as Early as Possible
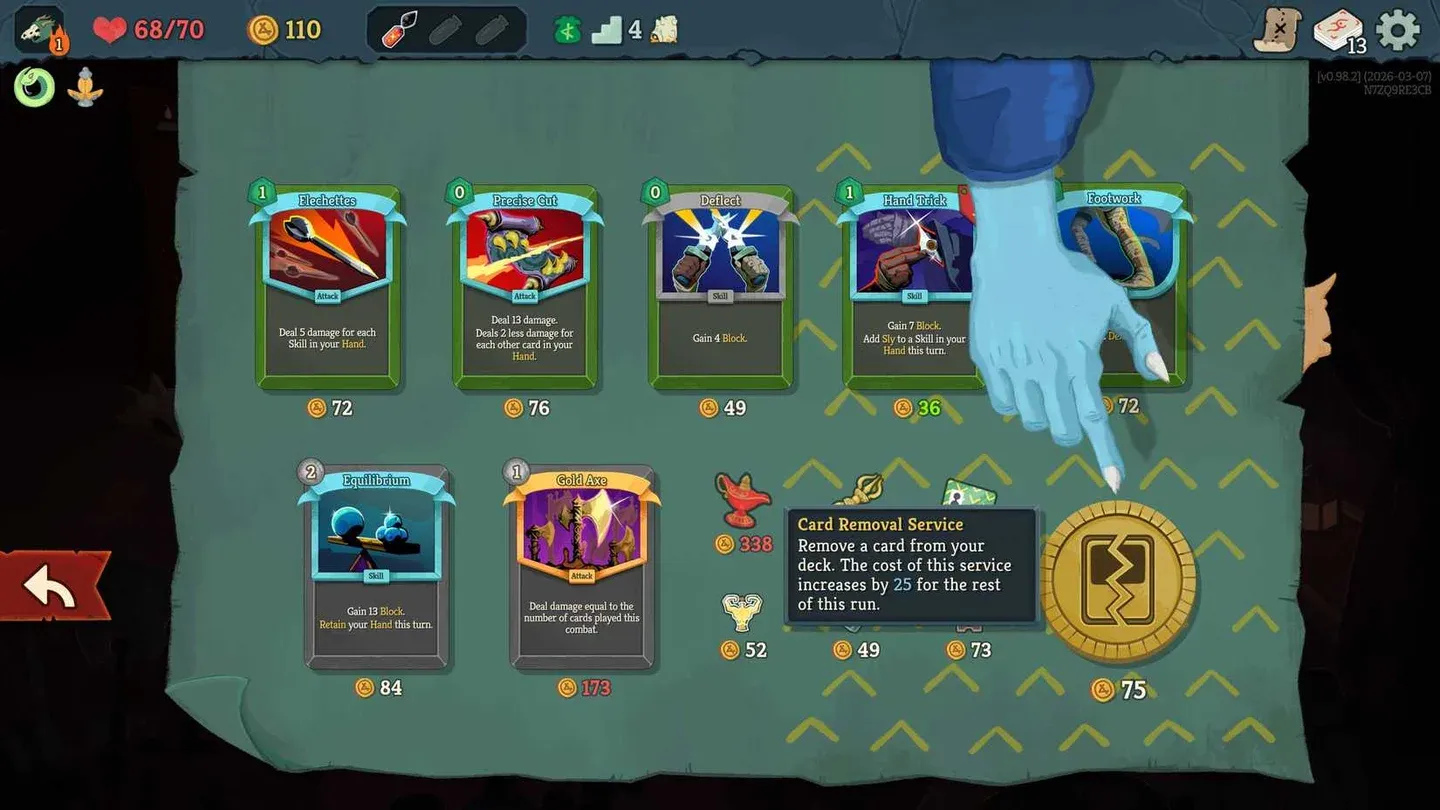
The starting deck, composed of five Strikes and five Defends, becomes obsolete almost immediately. For example, the Ironclad’s Pommel Strike costs only one energy but deals nine damage and draws a card—offering three more damage than a basic Strike for the same cost. Every time you find a superior alternative, your basic cards become "dead draws" that hinder your performance. Use the Merchant’s card removal service to prune these weak starters. The first removal costs 75 Gold, with the price increasing to 100 Gold for subsequent removals. Generally, you should prioritize removing Strikes before Defends and take advantage of map events that offer free or cheap card removal whenever possible.
How Do Relics Work and Why Do They Matter?
Relics are powerful items that grant permanent passive bonuses for the duration of your run. They serve as the primary engine for increasing your power level; understanding how to leverage them is what separates players who get stuck in Act 2 from those who consistently reach the finale. The most direct way to accumulate relics is by hunting Elite enemies. Every Elite you defeat rewards you with a relic, a card choice, gold, and potentially a potion.
Familiarize yourself with key relics like Orichalcum, which provides a safety net on turns where you can't generate block, or Vajra, which provides a significant strength boost for multi-hit attacks. Others, like the Mummified Hand, can completely define your strategy if you find them early. While it may be tempting to spend all your gold on shiny new cards, purchasing relics at the Merchant is often a better long-term investment. The passive benefits of a relic compound over the course of the entire run, providing value in every single room.
When planning your route, aim to defeat two or three Elites in Act 1. While these fights are dangerous and will cost you health, the relics they provide make your deck significantly stronger for the boss fight. Avoiding Elites to save HP often results in a "weak" deck that lacks the scaling necessary to survive the challenges of Act 2 and beyond.

What Should You Do at Campfires?
Campfires provide a vital moment of respite where you must choose between two primary actions: resting to regain 30% of your maximum HP or Smithing to permanently upgrade a card. In most scenarios, Smithing is the more impactful choice. Upgraded cards often feature reduced energy costs, increased damage, or secondary effects that can be the deciding factor in a difficult boss encounter. If you are lucky enough to find the Apotheosis card, which upgrades every card in your hand for the rest of the combat, it should be a top priority for your Smithing efforts.
It is helpful to view your HP as a resource to be spent rather than a score to be protected. As long as you have more than zero health, you are still in the fight. Using a rest site to Smith rather than heal might feel risky, but the increased efficiency of an upgraded deck often prevents more damage in future fights than the 30% heal would have restored. Try to path toward as many campfires as possible to maximize the number of upgrades you can perform before the act concludes. A deck full of upgraded cards is significantly more capable of handling the game's escalating difficulty than a deck of basic cards supported by a full health bar.
How Does the Map Work?
You can access the map at any time by clicking the icon in the top-right corner of the interface, even during dialogue sequences. This allows you to plan your long-term pathing with precision. The map uses specific icons to denote different encounter types: standard combat, Elite battles for relics, treasure chests, rest sites, Merchants, and unknown (?) rooms. Unknown rooms are randomized events that can grant powerful boons, but they can also impose heavy costs or debuffs.
If you are unsure what an icon means, hovering over the map legend will highlight all instances of that room type on your current floor, making it easier to visualize your potential routes. When deciding on a path, consider your current deck strength. If your deck is struggling, taking a gamble on unknown rooms might provide the high-roll reward you need to turn the run around. However, if your deck is already performing well, you might prefer a more predictable path through standard combats and shops.
Your starting bonus from Neow should also dictate your pathing. If you receive a large sum of gold, make sure your chosen route hits an early Merchant to spend it. Conversely, if you chose a bonus that reduced your maximum HP, you should avoid routes that are densely packed with Elite fights until you have gathered enough cards and relics to compensate for your lower durability.
How to Handle Combat Effectively?
Efficient combat in Slay the Spire 2 is built on the principle of damage mitigation. As a general rule, you should prioritize playing enough block cards to negate an enemy's incoming attack before you spend energy on offensive moves. Being overly aggressive and ignoring incoming damage will quickly drain your health, leaving you with fewer resources to handle the rest of the act.
Every turn requires a different tactical approach based on the enemy's declared intent, which is displayed above their head. When an enemy is not attacking—perhaps they are applying a debuff or charging up a shield—that is your window to play your most aggressive cards and maximize your damage output. Understanding these cycles of aggression and defense is essential for survival.
Additionally, don't be afraid to use your potions during Elite encounters. Many players make the mistake of hoarding potions for the final boss, but using a potion to end a difficult Elite fight early can save you a massive amount of HP. This preserved health allows you to Smith at the next campfire instead of resting, which provides a permanent boost to your deck's power. Treat potions as a tool to smooth out the most dangerous non-boss moments of your journey.