Why Are You Dying So Early in Act 1?
Most players who fail to reach the second act aren't victims of bad luck, but rather victims of poor decision-making. Early deaths usually stem from a series of small, avoidable errors that snowball into a failed run before the first elite is even encountered. Two specific habits are responsible for the vast majority of these losses: the compulsion to add every offered card to the deck and a total lack of strategic map planning.
Success in Slay the Spire 2 is built on the foundation of restraint. The most effective players are those who treat every choice as a long-term investment rather than a short-term gain. Instead of grabbing every flashy new ability, you must evaluate how each choice affects your deck's consistency. If you approach the first act with a disciplined mindset, you will find that "bad luck" becomes a much less frequent factor in your losses. By focusing on quality over quantity and planning your route with the boss in mind, you can survive the early game and set yourself up for a deep run.
How to Build a Deck That Actually Works
Maintaining a lean deck is the most important rule for consistent success. Every time you add a card, you decrease the likelihood of drawing your most vital tools when you need them most. A streamlined deck of roughly 22 cards ensures that your best options cycle back into your hand frequently. In contrast, a massive 40-card deck dilutes your power, turning your win conditions into rare occurrences that you might never see during a short fight. Before accepting a card reward, ask yourself if that specific card addresses a current hole in your strategy. If your defensive capabilities are already high, you do not need another block card. If a card doesn't offer immediate utility, skipping it is often the strongest tactical move you can make.
Furthermore, you must utilize the Merchant for card removal rather than just buying relics. Purging your deck of basic Strikes and Defends is one of the most effective ways to spend your gold. While these cards are necessary at the very start, they quickly become dead weight that hinders your momentum. A basic Strike deals minimal damage for its energy cost; drawing it instead of a high-impact attack can lose you a fight. Prioritize paying for card removal whenever you visit a shop, especially if you still have three or more starter cards clogging your rotation. Never spend all your currency on a relic if your deck is still bloated with basic cards, as the increased draw consistency of a smaller deck is far more valuable over time.
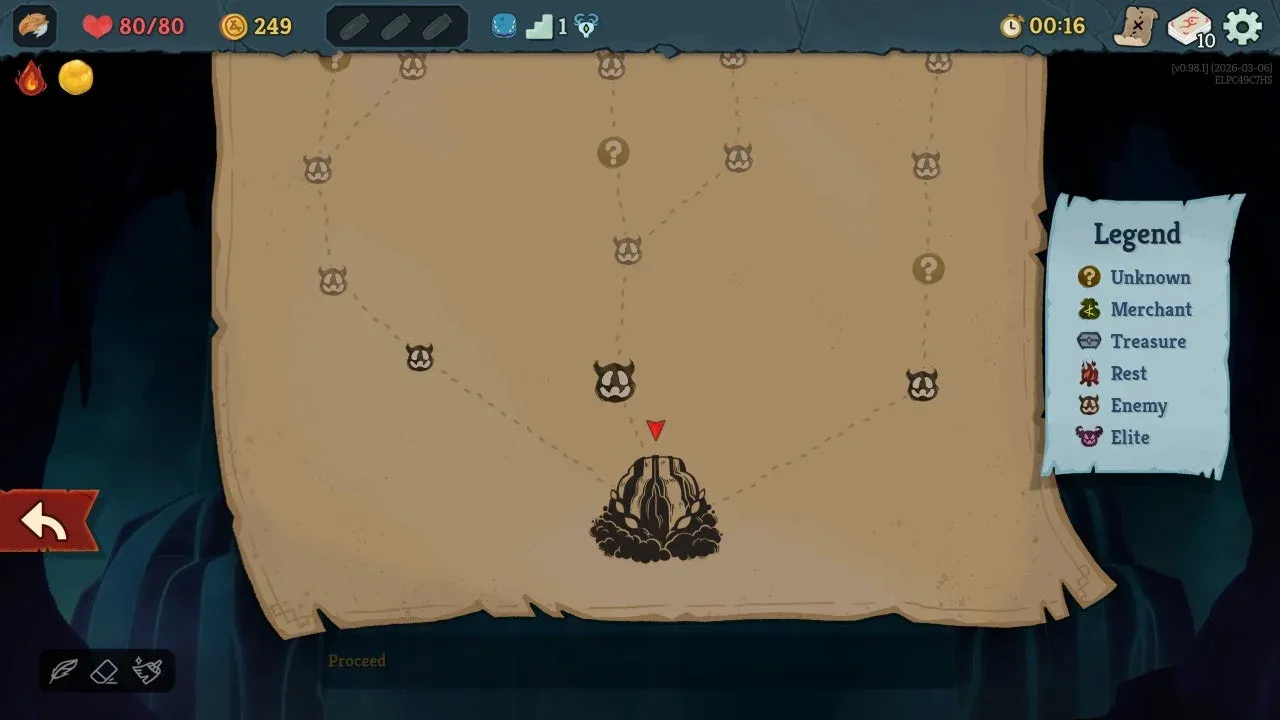
How to Read the Map Like a Strategist
Your strategy for every act should be determined before you even take your first step. As soon as the map generates, scroll to the top to identify which boss is waiting for you. Every choice you make on the climb—from card rewards to pathing—should be tailored to defeat that specific encounter. For instance, if the boss punishes you for playing too many attacks, you should prioritize defensive scaling or passive damage. If the boss has a high-damage phase that requires a quick kill, focus on energy generation and burst. Navigating the spire without knowing your final destination is a recipe for failure.
Regarding Elites, you should aim to fight at least two of them in the first act. While these battles are significantly more dangerous than standard enemies, they are the only reliable source of relics. These permanent passive buffs provide the scaling power necessary to survive the much harder encounters in Act 2 and beyond. Players who avoid Elites to save health often find themselves underpowered and ill-equipped for the mid-game. To mitigate the risk, try to path through a Campfire immediately before an Elite fight. This allows you to upgrade a key card, giving you a much-needed edge. At Campfires, try to prioritize upgrades over resting. Since ending a fight quickly prevents damage, a permanent upgrade is usually better than a one-time heal. Only rest if you are certain you won't survive the next room without more HP.
What New Mechanics Will Kill You in Act 1?
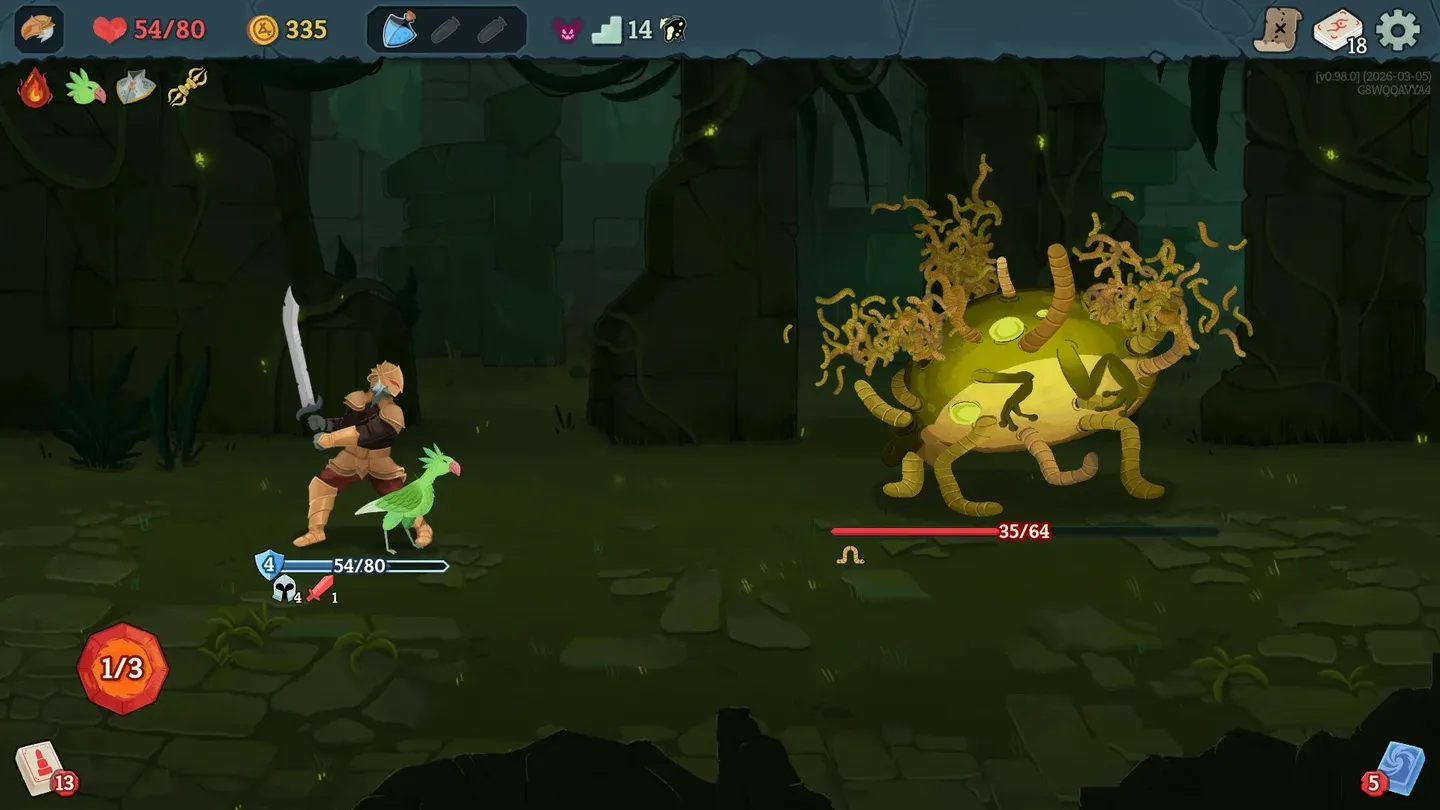
Slay the Spire 2 introduces several dangerous mechanics that require immediate tactical adjustments. The first is Pierce, an enemy buff that allows attacks to bypass your Block and hit your health directly. When facing an enemy with Pierce, stacking armor is a waste of energy. Instead, you must rely on the Weak debuff. Since Weak reduces an enemy's damage by 25%, it is the most effective way to lower the incoming damage from a Pierce attack. Another lethal addition is Corrosion, a status effect that permanently reduces your maximum HP at the end of every turn it remains active. You cannot win a battle of attrition against Corrosion; your only viable strategy is to use high-burst damage to kill the enemy before your health pool is permanently destroyed.
New card types also introduce unique risks. Enchantments can provide massive power boosts, but they often come with hidden costs, such as draining your max HP or increasing energy requirements each time they are played. Always calculate the long-term health cost of an Enchantment before adding it to your deck. Quest Cards are another challenge; they are unplayable cards that sit in your hand until you fulfill a specific condition to transform them. Taking a Quest Card means you are essentially playing with a smaller hand size until the quest is finished. Finally, keep an eye on Durability. Many relics and cards now have a limited number of uses per combat. Unlike the original game, you cannot rely on these items to trigger indefinitely during long boss fights, so plan your activations carefully to ensure they don't run out when you need them most.
Which Character Should Beginners Pick?
If you are struggling to make it past the first boss, the Ironclad is the best choice for learning the ropes. His starting relic provides a small heal after every combat, offering a safety net that allows for more mistakes as you learn enemy patterns. His gameplay is straightforward: use Strength-building cards to hit harder and utilize Exhaust mechanics to trim your deck during longer fights. Once you feel comfortable with the game's flow, the Regent offers a more tactical experience. He uses a resource called Stars that carries over between turns, allowing for patient setup. The goal with the Regent is to accumulate Stars over several turns before unleashing a massive Sovereign Blade strike to finish the fight.
The Necrobinder is the most complex and punishing character for new players. She uses her own health as a resource to fuel powerful Blood Magic and relies on her skeletal minion, Osty, to absorb damage. Managing your HP while simultaneously using it as "mana" is a difficult balancing act that can easily lead to a quick death. Her signature mechanic is the Doom debuff, which triggers an instant kill if the amount of Doom on an enemy meets or exceeds their current HP at the end of a turn. While this playstyle is incredibly satisfying, it requires a deep understanding of math and enemy health thresholds, making her a high-risk pick for beginners still trying to master Act 1 survival.
How Does Co-op Work in Slay the Spire 2?
Multiplayer in Slay the Spire 2 supports up to four players in a single run. There is no automated matchmaking, so you must invite players directly from your Steam friends list. The game session is hosted locally on the creator's save file, meaning the host must stay online for the entire duration of the play session. Because the game is balanced for cooperative play, solo players might find that unlocking new cards and town upgrades takes a bit longer. If you want to speed up your progression, farming the first act is the most efficient strategy.
To farm experience quickly, build a deck focused on high-damage, frontloaded attacks like Whirlwind or Thunderclap. Your goal is to clear Act 1 as fast as possible, defeat the boss, and then enter Act 2. Once there, let the first enemy you encounter kill you. This entire loop takes about 15 minutes and yields a significant amount of XP for your character level and town unlocks. It is vital to